Mail Providers
Connect an email provider to automatically send certificates at scale using Smart Certificates.
You can choose between using your own Gmail accounts or integrating with powerful third-party email services for higher deliverability and volume.
Each provider requires basic authentication credentials and a verified sender identity to ensure secure and reliable email delivery.
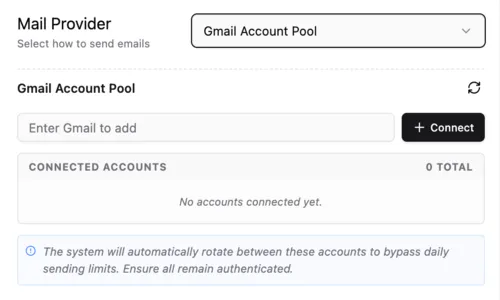
Gmail Account Pool
A simple and cost-effective way to send emails by rotating multiple Gmail accounts without using external services.
The Gmail Account Pool allows you to connect multiple Google accounts to send certificates. This is an ideal way to scale your sending volume without using a paid third-party service.
What you need
- One or more personal or Google Workspace accounts.
- Access to authorize the accounts via Google OAuth.
Steps
1. Add a Gmail Account
- In the Gmail Account Pool section, enter the Gmail address you want to add.
- Click the + Connect button.
2. Authorize via Google
- A Google sign-in window will appear. Select your account and grant the necessary permissions for Smart Certificates to send emails on your behalf.
- Once authorized, the account will appear under Connected Accounts.
3. Scaling your Pool
- You can add multiple accounts to the pool. The system will automatically rotate between these accounts to bypass daily sending limits (typically 500–2,000 emails per day depending on your Google account type).
💡 Tip: Ensure all connected accounts remain authenticated. If you change your Google password, you will need to re-connect the account to the pool.
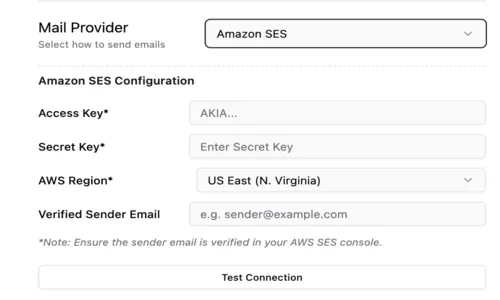
Amazon SES
A highly scalable and cost-efficient cloud email service by AWS, ideal for bulk and production-level sending.
What you need
- AWS account
- Access Key & Secret Key
- Verified sender email
Steps
1. Create IAM User
- Go to: AWS IAM Console
- Create user with Programmatic Access
- Attach policy:
AmazonSESFullAccess - Copy Access Key and Secret Key
2. Verify Email
- Go to: Amazon SES Console
- Open Verified Identities
- Add and verify your email
3. Add in Smart Certificates
- Access Key
- Secret Key
- Region (e.g.
us-east-1) - Sender Email
👉 Click Test Connection
SendGrid
A popular developer-friendly email API known for easy integration and reliable delivery.
What you need
- SendGrid account
- API Key
- Verified sender email
Steps
1. Create API Key
- Go to: SendGrid Dashboard
- Settings → API Keys
- Create key with Mail Send access
- Copy API key
2. Verify Sender
- Settings → Sender Authentication
- Verify email or domain
3. Add in Smart Certificates
- API Key
- Sender Email
👉 Click Test Connection
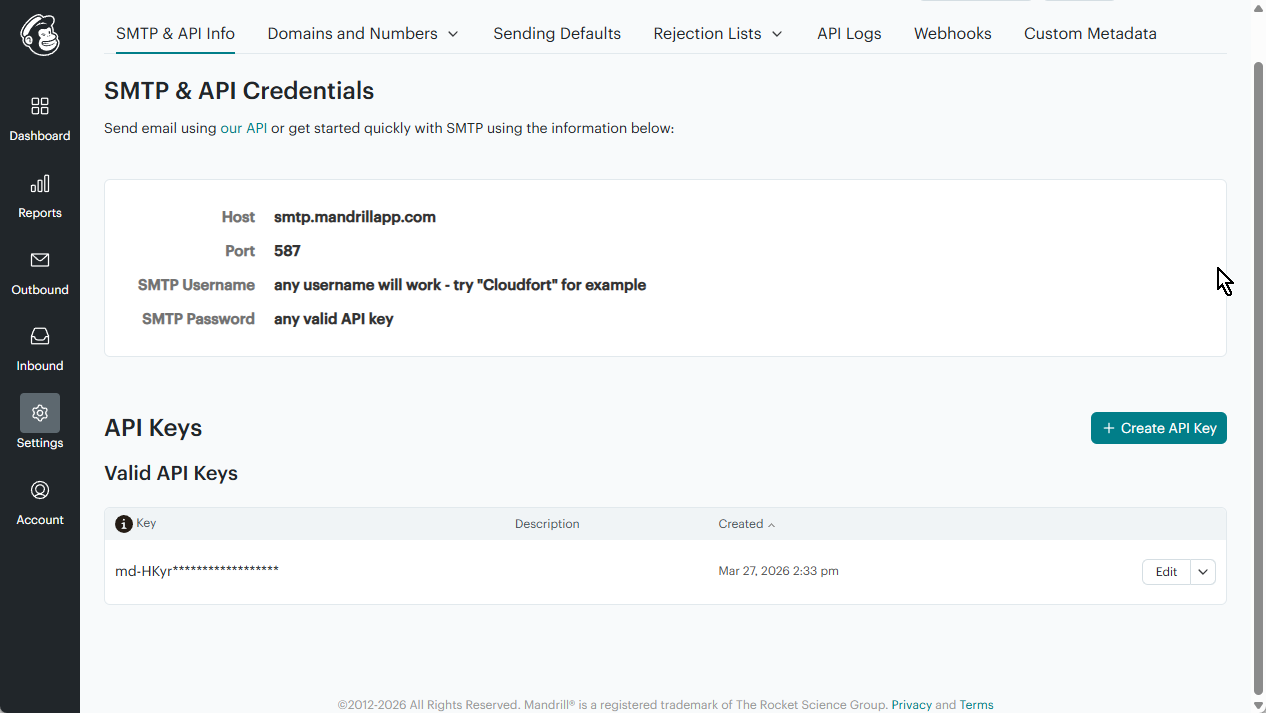
Mailchimp (Mandrill)
A transactional email service powered by Mandrill, best for users already using Mailchimp.
Mailchimp uses Mandrill for transactional emails like certificate delivery. You will need a Mailchimp account with the Transactional Email add-on enabled.
What you need
- Mailchimp account with Mandrill add-on.
- Mandrill API Key.
- Verified sender email.

Steps
1. Get Mandrill API Key
- Log in to your Mandrill Dashboard
- Go to Settings > API Keys
- Click + New API Key and copy the generated key
Step-by-step guide:
Step 1.1: Navigate to Settings → Click ”+ Create API Key”
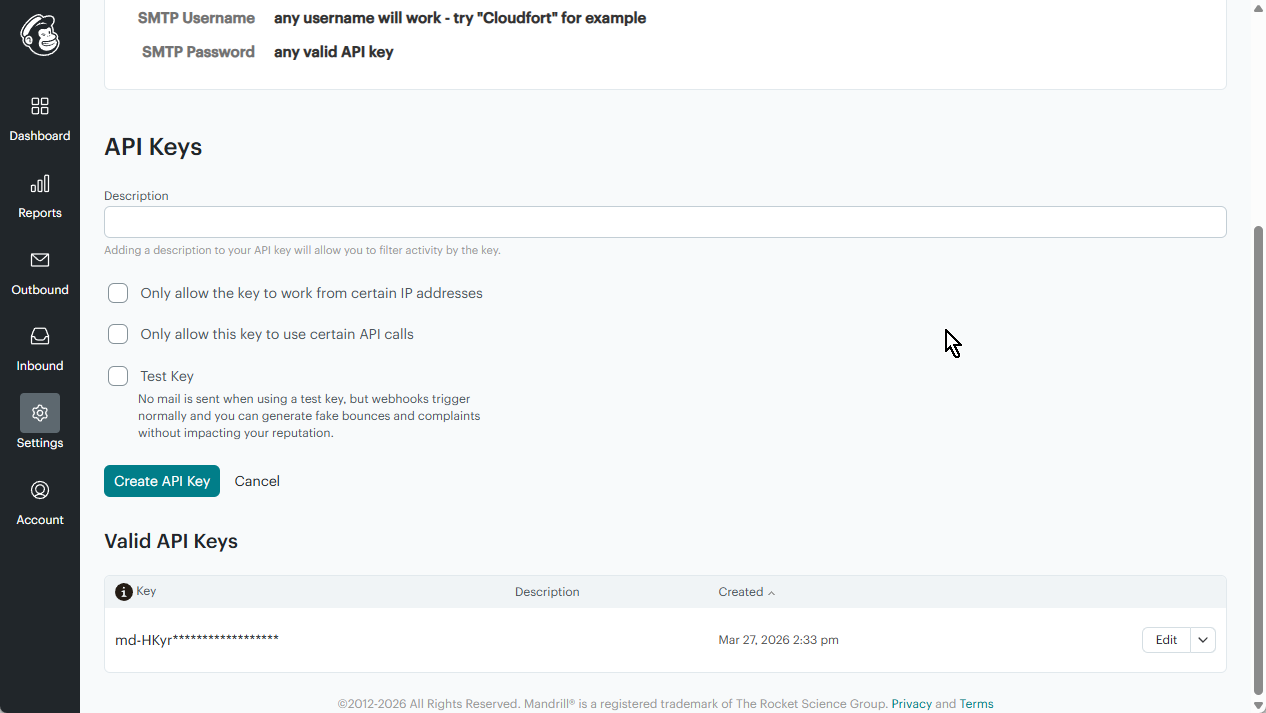
Step 1.2: Copy the generated key
2. Add in Smart Certificates
- API Key: Your Mandrill API Key
- Sender Email: The email address authorized in your Mandrill account
👉 Click Test Connection
Mailgun
A powerful email automation service with strong APIs, ideal for developers and bulk sending.
What you need
- Mailgun account
- API Key
- Verified domain

Steps
1. Get API Key
- Go to: Mailgun Dashboard
- Settings → API Keys
- Copy Private API Key
2. Verify Domain
- Sending → Domains
- Add domain and configure DNS
3. Add in Smart Certificates
- API Key
- Domain (e.g.
mg.yourdomain.com) - Region (US / EU)
- Sender Email
👉 Click Test Connection
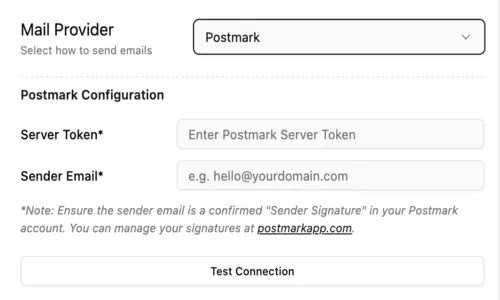
Postmark
A fast and reliable email service focused on high deliverability for transactional emails.
Postmark is known for its high deliverability and speed. To use it, you will need to create a Server and obtain a Server Token.
What you need
- Postmark account.
- Server Token.
- Confirmed “Sender Signature”.
Steps
1. Get Server Token
- Log in to your Postmark Dashboard
- Select the Server
- Navigate to API Tokens
- Copy the Server API Token
2. Verify Sender Signature
- Go to Sender Signatures
- Ensure the email address is confirmed
3. Add in Smart Certificates
- Server Token
- Sender Email
👉 Click Test Connection
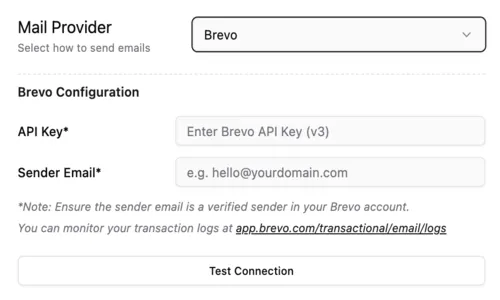
Brevo
An all-in-one marketing and transactional email platform with simple setup and good pricing.
Brevo (formerly Sendinblue) provides a reliable transactional email service.
What you need
- Brevo account
- API Key (v3)
- Verified sender email
Steps
1. Get API Key
- Go to: Brevo Dashboard
Step-by-step guide:
Step 1.1: My Profile → Settings
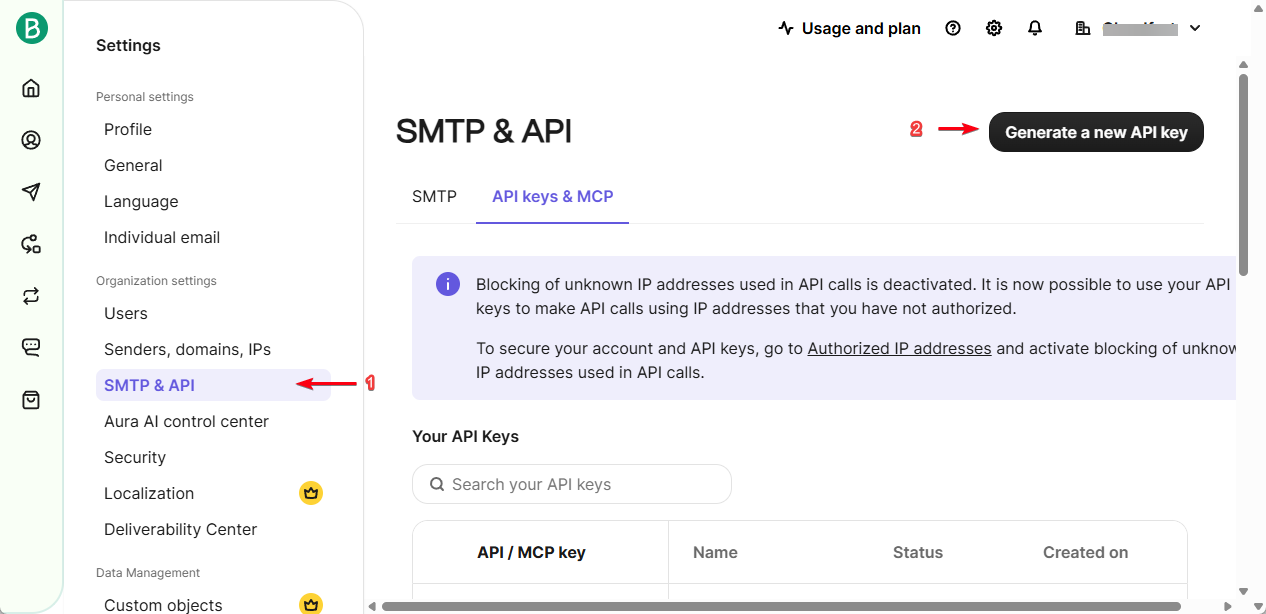
Step 1.2: SMTP & API → Click “Generate a new API Key”
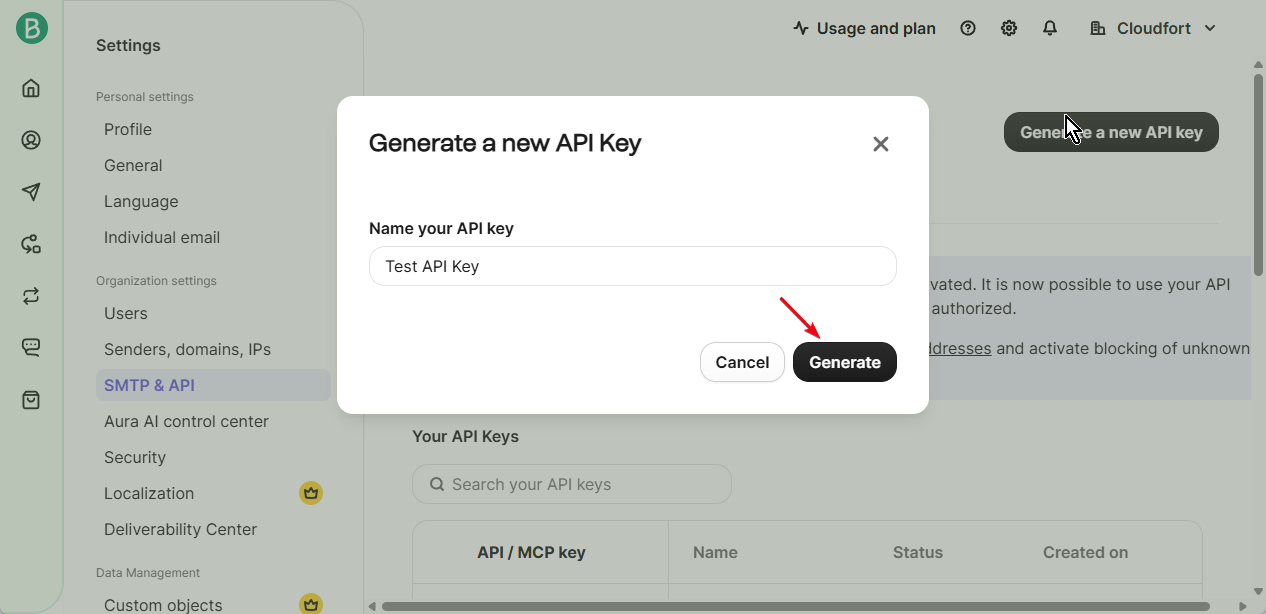
Step 1.3: Click “Generate” → Copy API Key
2. Verify Sender
- Go to Senders & IP
- Verify email
3. Add in Smart Certificates
- API Key
- Sender Email
👉 Click Test Connection
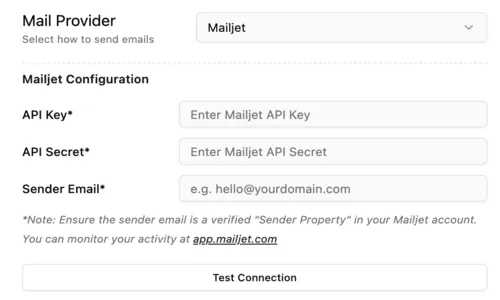
Mailjet
A flexible email service offering both marketing and transactional capabilities.
What you need
- Mailjet account
- API Key & Secret
- Verified sender
Steps
1. Get API Credentials
- Go to: Mailjet Dashboard
- API Key Management
- Copy credentials
2. Verify Sender
- Verify email/domain
3. Add in Smart Certificates
- API Key
- API Secret
- Sender Email
👉 Click Test Connection
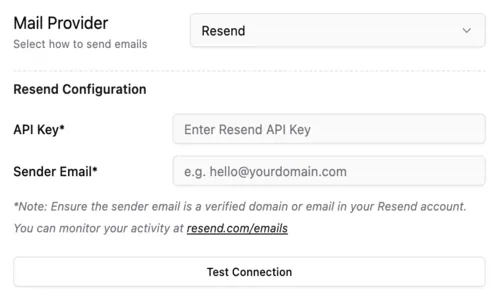
Resend
A modern developer-first email API with a clean interface and simple integration.
What you need
- Resend account
- API Key
- Verified identity
Steps
1. Create API Key
- Go to: Resend Dashboard
Step-by-step guide:
Step 1.1: Navigate to API Keys & Click ”+ Create API Key”
Step 1.2: After filling API Key Name, Permission and Domain, Click “Add”
Step 1.3: Copy your API Key
2. Add in Smart Certificates
- API Key
- Sender Email
👉 Click Test Connection
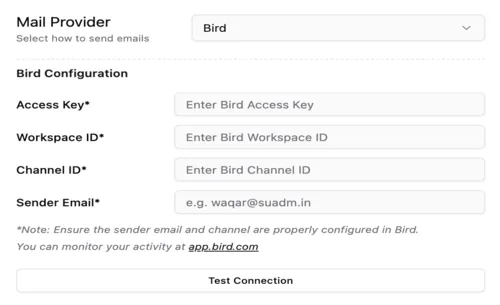
Bird
An enterprise-grade communication platform designed for high-scale messaging.
What you need
- Bird account
- Access Key
- Workspace ID
- Channel ID
Steps
1. Get Access Key
- Go to: Bird Dashboard
Step-by-step guide:
Step 1.1: Navigate to Settings → Access Keys
Step 1.2: Create new Access Key
Step 1.3: Save & Copy Access Key
2. Get Workspace ID
Step 2.1: Go to your Workspace
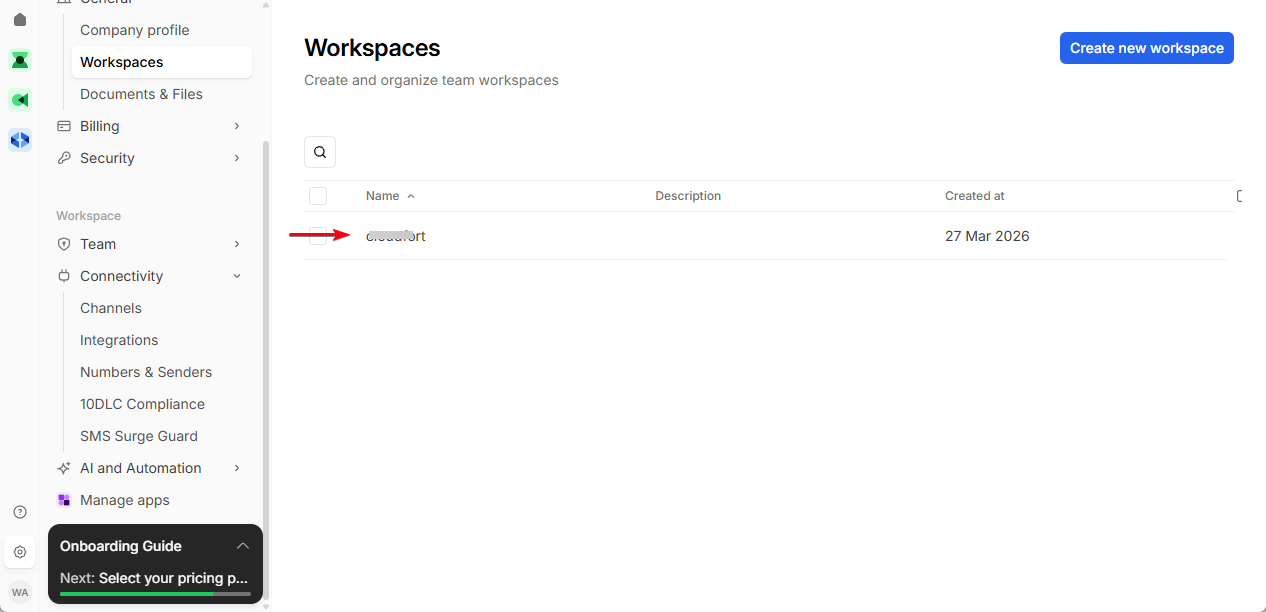
Step 2.2: Find your existing workspace or create new workspace
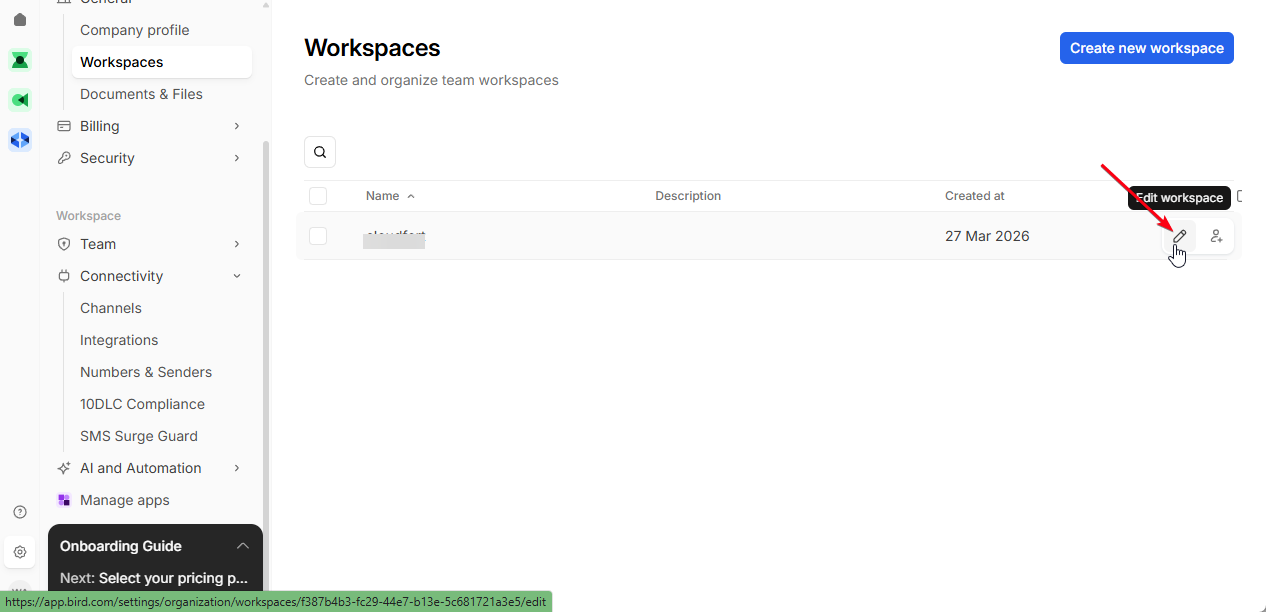
Step 2.3: Edit your workspace
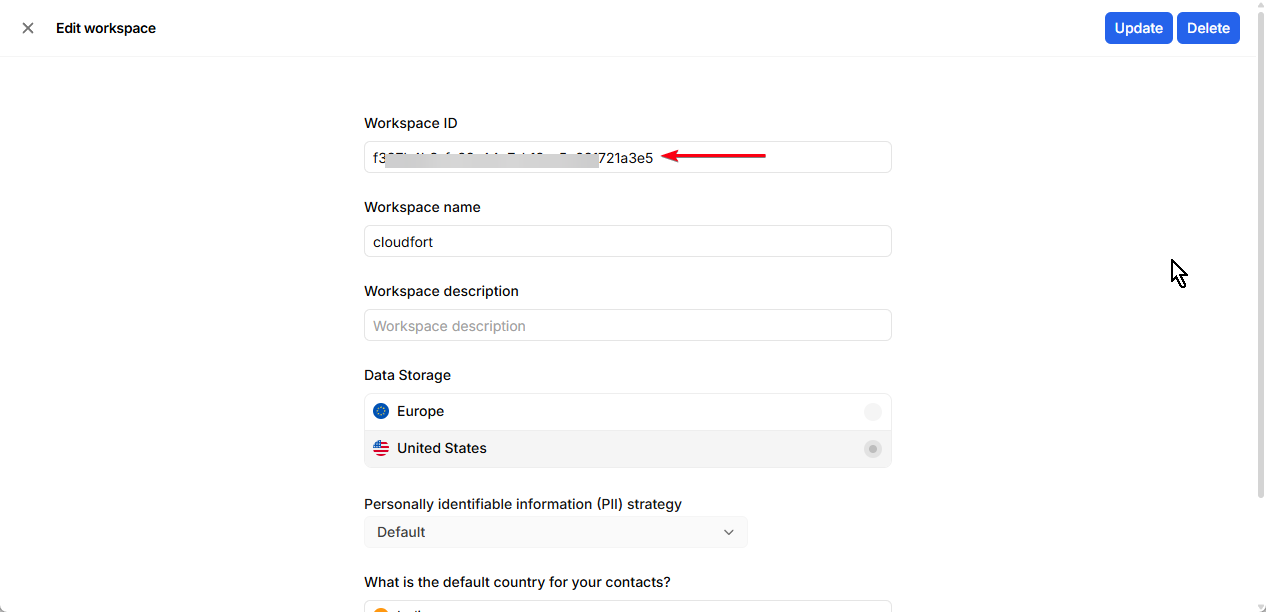
Step 2.4: Copy Workspace ID
3. Get Channel ID
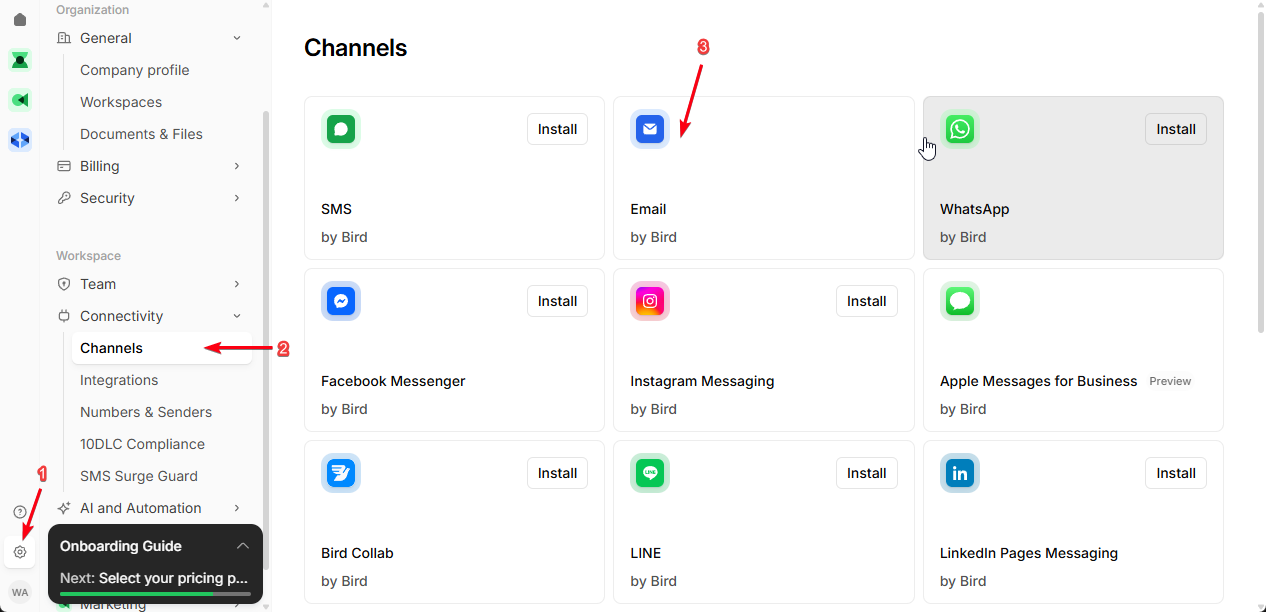
Step 3.1: Go to Channels & Select Email Channel
Step 3.2: View Channel Details
Step 3.3: Click on Channel Settings
Step 3.4: Copy Channel ID
4. Add in Smart Certificates
- Access Key
- Workspace ID
- Channel ID
- Sender Email
👉 Click Test Connection
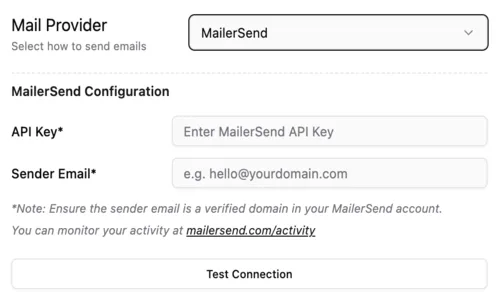
MailerSend
A lightweight and fast transactional email service built for developers.
What you need
- MailerSend account
- API Key
- Verified domain
Steps
1. Create API Key
- Go to: MailerSend Dashboard
Step-by-step guide:
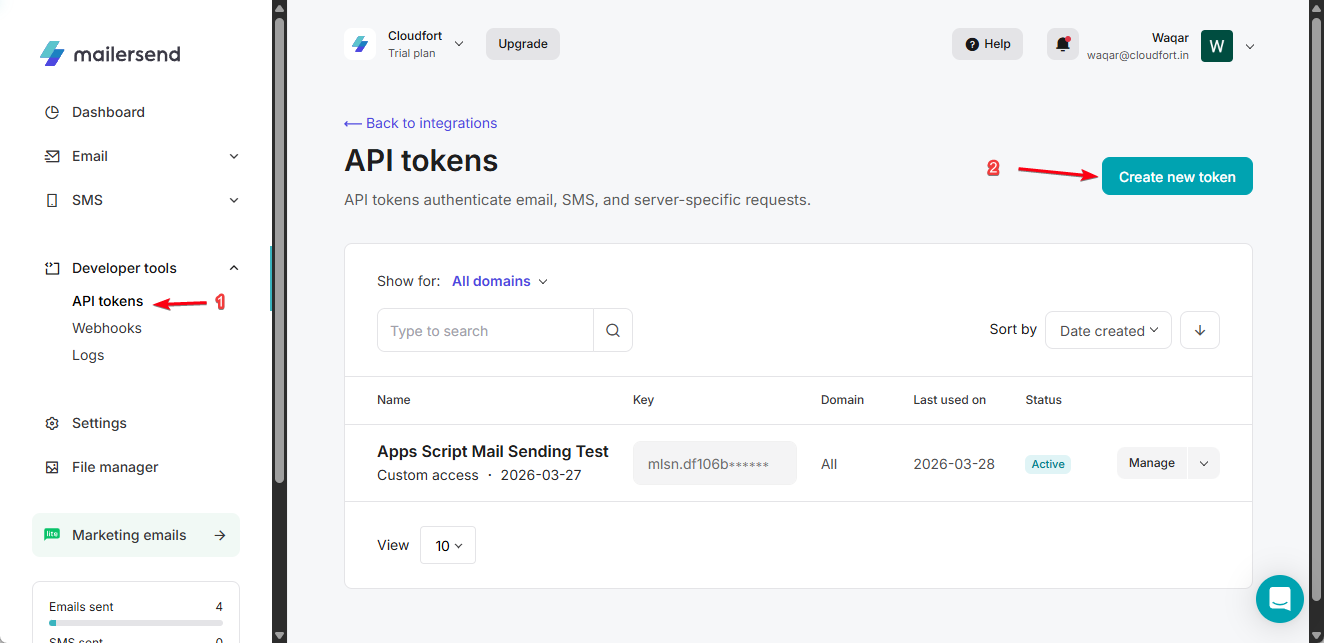
Step 1.1: Navigate to API Tokens → Create new token
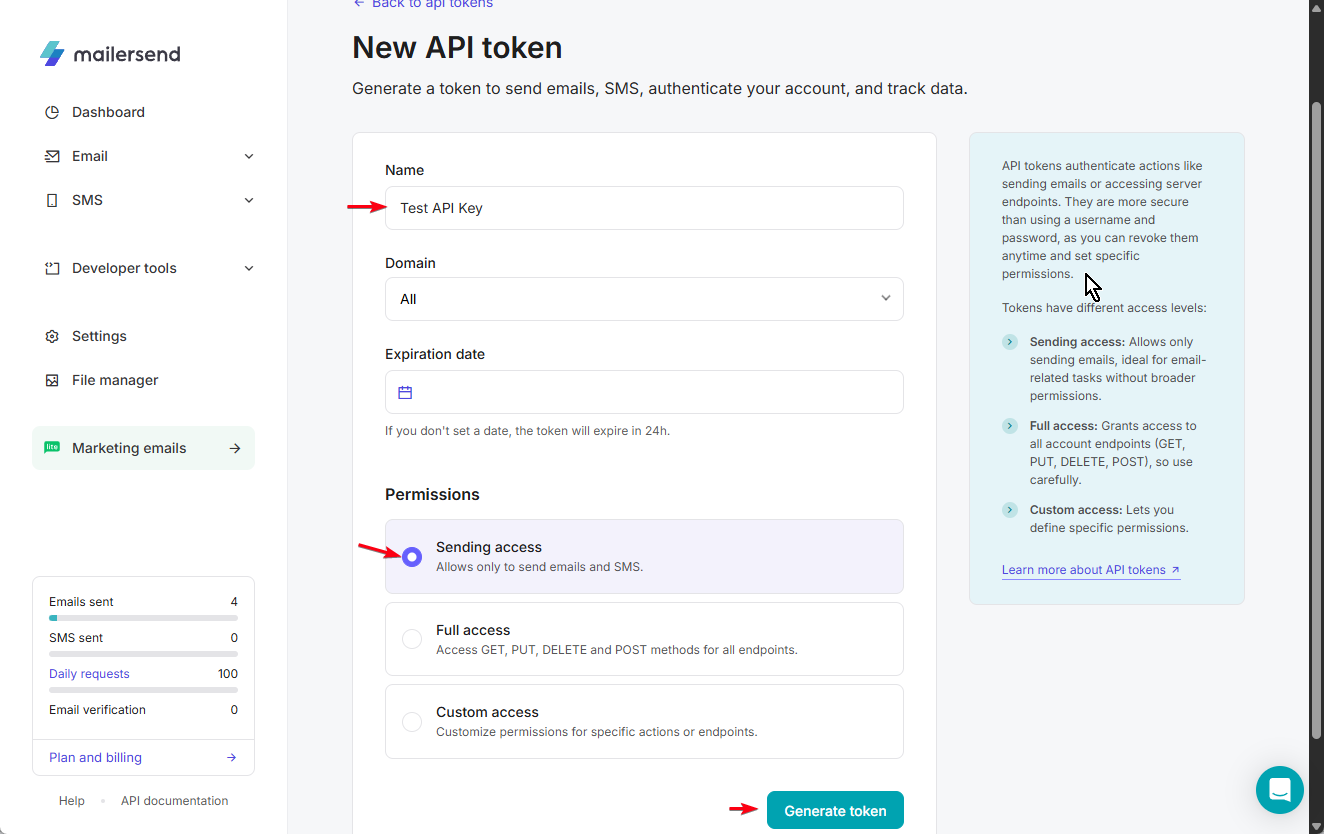
Step 1.2: Click “Generate Token” button
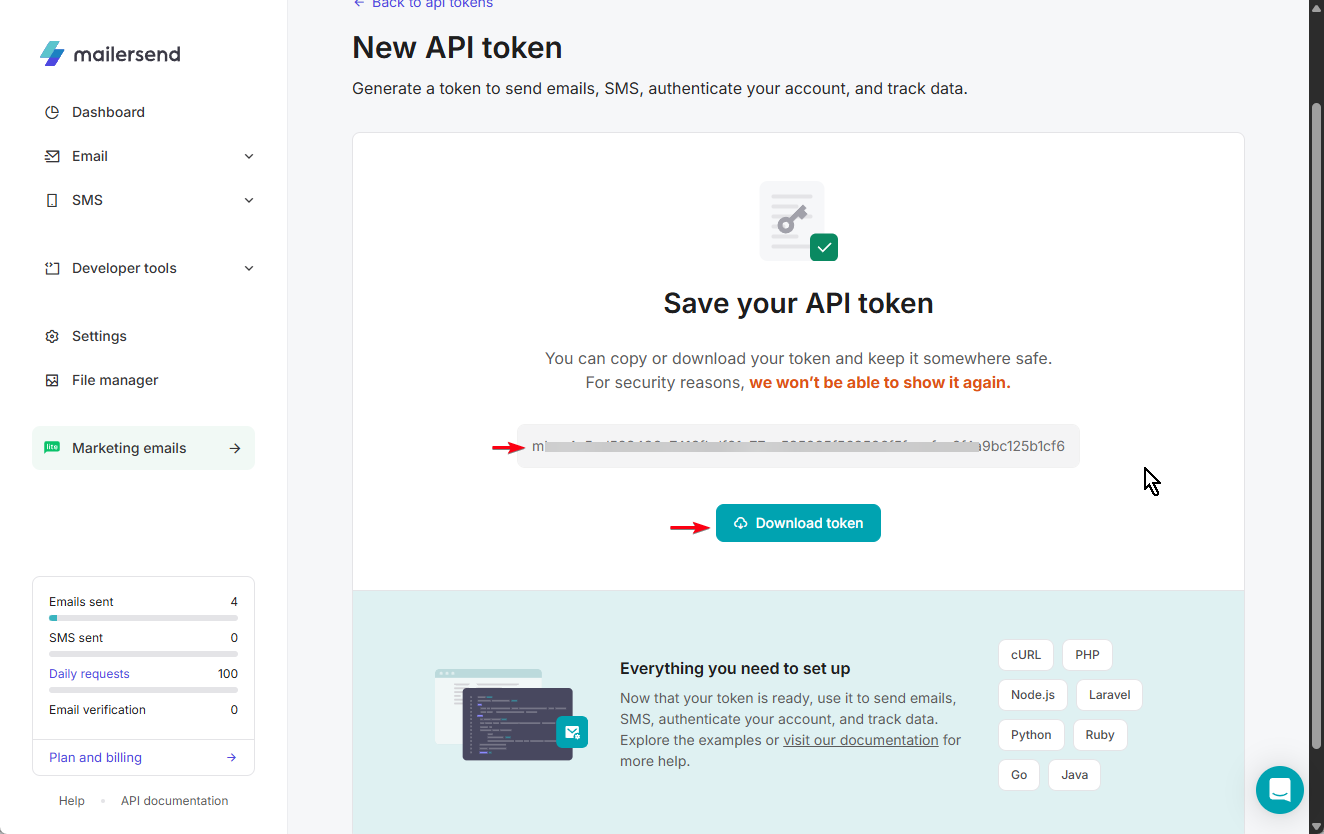
Step 1.3: Copy or download the generated API token
2. Add in Smart Certificates
- API Key
- Sender Email
👉 Click Test Connection
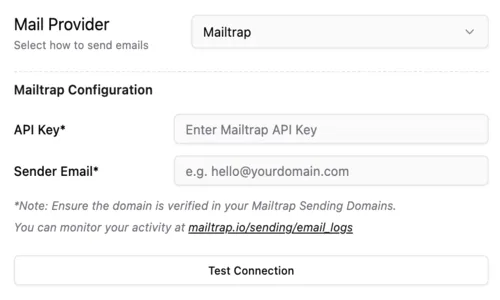
Mailtrap
A safe email testing and delivery platform.
What you need
- Mailtrap account
- API Key
- Verified domain
Steps
1. Get API Key
- Go to: Mailtrap Dashboard
- API Tokens
2. Verify Domain
- Configure DNS
3. Add in Smart Certificates
- API Key
- Sender Email
👉 Click Test Connection
Summary
To start sending certificates:
- Choose a provider based on your needs (Gmail for simplicity, APIs for scale)
- Add the required credentials in Smart Certificates
- Verify your sender email or domain
- Test the connection to ensure everything is working
Once configured, your certificates will be delivered automatically with high reliability 🚀